When to Change Air Purifier Filter Levoit: A Practical Guide
Learn how to determine the right time to replace Levoit air purifier filters. Signs, timing, and safe replacement steps for cleaner indoor air in 2026.

To keep a Levoit air purifier performing optimally, change the filter based on usage and noticeable changes in airflow or odor instead of a fixed date. Most models signal a replacement via the indicator light or app. In homes with pets, allergies, or heavy dust, expect somewhat more frequent changes. Air Purifier Info team notes that timing varies by model and environment.
Why replacement timing matters for indoor air quality
When to change air purifier filter levoit is a practical question for homeowners aiming to maintain clean indoor air. The goal is to keep air flowing freely so irritants like dust, pollen, pet dander, and cooking odors don’t build up in living spaces. A filter that is too dirty forces the purifier to work harder, which can reduce its declared air-cleaning rate and increase energy use. The Air Purifier Info team notes that timing varies by model and environment, so treat this guidance as a starting point rather than a one-size-fits-all rule. In homes with pets or frequent cooking, replacement may be needed sooner; in quiet spaces with low traffic, less frequent changes may suffice. Rely on the device’s indicator and any mobile app alerts, then assess air freshness with your own senses. Consistent, timely changes help maintain the expected air quality and comfort year-round.
Understanding Levoit filter indicators and common signals
Levoit purifiers commonly include an indicator light or an app-based alert to signal when a filter should be replaced. The signals are designed to reflect how much particulates the filter has trapped over time, rather than a strict calendar date. In practice, a dimmed airflow, faint odor, or longer run times to achieve the same air quality are practical cues. According to Air Purifier Info analysis, model differences matter: some units use a straightforward light, others rely on software prompts. Regardless, use the signal as your baseline and corroborate with room conditions and air quality feedback. This approach helps ensure you replace filters at roughly the right moment for your specific living space.
Factors that influence replacement timing
Several influences determine how often you should change a Levoit filter. Room size, ceiling height, and how often you run the purifier affect filter saturation. Pets, smokers, and households with high dust levels tend to load filters more quickly. Allergies or sensitivities in household members can also push for more frequent changes. The type of filter (pre-filter, carbon, HEPA, or composite) interacts with usage to determine interval length. Environmental conditions matter as well: open windows, seasonal shedding, and cooking activity can accelerate filter loading. In practice, track how quickly the unit reaches the same air quality targets and adjust accordingly. Air Purifier Info’s ongoing observations emphasize avoiding rigid schedules in favor of real-world cues.
How to estimate replacement interval without model-specific data
If you don’t have model-specific guidance handy, start with observable cues. Monitor airflow and odor; a noticeable drop in performance typically signals a change is due. Use the purifier’s indicator or app alerts as a baseline, then confirm with air freshness in your living space. Keep a simple usage log for a few weeks noting days with pets, cooking, or heavy dust. This log helps you infer whether replacements are staying within a reasonable window for your home. Air Purifier Info Team suggests using a bias toward more frequent changes in high-load environments to prevent air-quality dips, while reducing changes in low-traffic spaces where air exchanges occur more slowly.
How to check the filter condition yourself
A quick physical check can save unnecessary replacements. Power off and unplug the unit, then open the filter compartment and inspect the cartridge. Look for visible discoloration, a noticeable buildup of dust, or compressed media that no longer looks fluffy. A strong odor or a compressed filter is a sign to replace. If you have a pre-filter, brush away loose dust gently rather than washing the main filter, which can damage performance. After inspecting, dispose of the old cartridge properly and prepare a new one according to the manufacturer’s instructions.
What to expect during replacement
When you’re ready to swap the filter, expect a straightforward process that usually takes a short amount of time. Power off and unplug, remove the old cartridge, and install the new one in the correct orientation. Some Levoit models require reset of the indicator after installation; others automatically reset when you power the unit back on. Ensure the housing is securely closed and the purifier is placed on a stable, level surface. Run the unit briefly on a low setting to confirm proper airflow and even filtration.
Handling filters safely and disposal
Filters collect fine dust, allergens, and odors, so handle them carefully to minimize exposure. Wear disposable gloves if desired and seal used filters in a trash bag before disposal. Do not recycle used carbon or HEPA cartridges unless your local facility accepts them. Store replacement filters in their original packaging until installation to protect the media. If you have concerns about potential irritants, consider disposing of filters during a time when others in the home are not sensitive to dust.
Common mistakes and troubleshooting
Avoid the temptation to wash the main filter; most Levoit filters are not designed to be reused after washing and may lose effectiveness. Do not force the filter housing closed if the cartridge doesn’t seat properly. Misaligning the filter or leaving packaging on an new cartridge can impede airflow. If performance seems off after replacement, check that the filter matches the model, reseat the unit, and reset any indicators. If issues persist, confirm you are not exceeding recommended room size for the purifier.
Model-specific cues and Air Purifier Info guidance
Models differ in filter types, indicator logic, and reset procedures. Always verify compatibility when purchasing a replacement filter and consult the user manual for orientation and reset steps. Air Purifier Info Team emphasizes using only model-compatible filters to maintain performance and safeguard warranty where applicable. In practice, rely on model prompts, plus air-quality cues, to schedule changes that keep your indoor air clean and comfortable.
Tools & Materials
- Levoit replacement filter (model-compatible)(Choose a filter specified for your Levoit purifier model and verify compatibility.)
- Disposable gloves (optional)(Keeps hands clean when handling dusty filters.)
- Soft microfiber cloth(For light housing cleaning around the filter slot. Do not wet the main filter.)
- Trash bag(Seal old filter securely for disposal.)
- Small screwdriver (optional)(Only if your model uses screws to access the filter.)
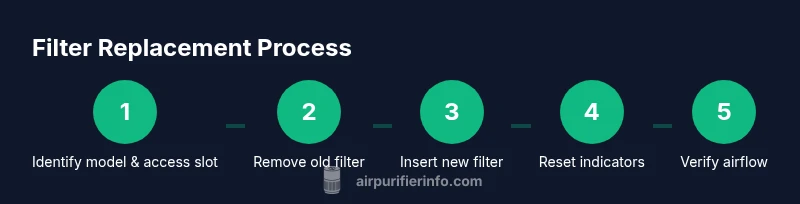
Steps
Estimated time: 15-25 minutes
- 1
Power off and unplug
Before touching the purifier, turn it off and unplug from the wall to ensure safety. This also prevents accidental startup during the replacement.
Tip: If you have pets nearby, do this in a quiet area to avoid startling them. - 2
Open the housing and locate the old filter
Access the filter compartment according to your model’s design. Remove any outer casing or grills as needed to reveal the cartridge.
Tip: Note the filter orientation arrows to ensure correct installation later. - 3
Remove the old filter
Carefully pull the old filter straight out to avoid tearing the media. Do not spin or shake the cartridge, which could release dust.
Tip: Place the used filter into a sealed bag for disposal. - 4
Install the new filter
Unpack and insert the new filter in the correct orientation. Make sure it sits firmly and the housing closes without gaps.
Tip: Double-check alignment with arrows and the label facing outward if applicable. - 5
Reset indicators and reassemble
If your model requires a reset after replacement, perform it per the manual. Reassemble the housing and ensure all fasteners are secure.
Tip: Power on and run on a low setting briefly to verify airflow is normal. - 6
Test airflow and seal
Check that air is flowing smoothly through the unit and that there are no rattling sounds indicating a loose fit.
Tip: If airflow seems weak, recheck the filter seating and seals. - 7
Clean up and dispose safely
Wipe away any dust around the unit and close the work area. Dispose of the used filter in a sealed bag.
Tip: Wash hands after handling dusty components.
Questions & Answers
How often should I change Levoit filter?
Replacement frequency depends on usage, environment, and model. If you notice weaker airflow, odors, or the indicator signals a replacement, act. Keep in mind that timing can vary; use the signals as your guide rather than a strict schedule.
Change the filter when you notice reduced airflow or odors, or when the device indicates replacement is needed.
Can I wash Levoit filters?
Most Levoit filters are not designed to be washed and re-used. Washing can damage the filtration media and reduce effectiveness. Replace with a compatible filter according to the manufacturer’s guidance.
Filters aren’t usually washable; replace with a new one as directed by the manufacturer.
What signals indicate a replacement is needed?
Indicator lights, reduced airflow, and noticeable odors are common cues. Some models also provide app alerts. Use these signals in conjunction with your air quality experience to time changes.
Look for the light, airflow changes, or odor changes as your cue.
Can I use non-brand filters with Levoit?
Using filters not recommended by the manufacturer can affect performance and may impact warranty. Prefer compatible Levoit filters or those explicitly labeled for your model.
Stick to compatible filters to protect performance and warranty.
Does changing the filter affect warranty?
In most cases, replacing with recommended filters maintains warranty coverage. Using non-recommended filters can risk voiding parts of the warranty. Always check the warranty terms for your specific model.
Warranty is usually preserved when using approved filters.
Watch Video
Main Points
- Check indicators before replacing to avoid unnecessary changes
- Use model-compatible filters for performance
- Environment drives timing more than a calendar date
- Do not wash the main filter; replace with a new one
- Reset indicators after installation where required