Air Purifier After Renovation: A Practical Guide
Restore indoor air quality after renovation with the right air purifier: choose true HEPA filtration and carbon, position for coverage, and maintain filters for lasting clean air in your home.

According to Air Purifier Info, post-renovation air quality often contains fine dust and VOCs from paints, adhesives, and sealants. An air purifier with a true HEPA filter and activated carbon is essential. Run it continuously for 24-72 hours after the last construction activity, then schedule maintenance checks to keep circulating clean air.
Understanding post-renovation air quality
After renovation, indoor air quality can be significantly affected by a mix of fine dust and chemical fumes. Construction activities release drywall dust, sanding debris, and volatile organic compounds (VOCs) from paints, primers, adhesives, sealants, and finishes. Even after visible cleanup, microscopic particles cling to surfaces and float in the air, ready to be inhaled with every breath. According to Air Purifier Info, post-renovation air quality often contains these pollutants at levels that irritate eyes, skin, throat, and the respiratory system—especially for children, seniors, or households with allergies or asthma. An air purifier after renovation is not a luxury; it’s a practical step to restore comfortable, healthy indoor air while you finish the cleanup. This guide helps you choose the right purifier, position it for maximum effectiveness, and maintain filtration during and after construction, so you can reclaim air quality more quickly.
Key pollutants introduced by renovations
Renovation activities introduce a mix of irritants that can linger in the air long after visible dust is cleaned. Common pollutants include:
- Drywall dust and sanding debris that can slip past ordinary cleaning tools.
- VOCs from paints, primers, solvents, adhesives, and finishes.
- Odors from new materials and furnishings.
- Mold spores if moisture was involved during construction.
- Fine particulate matter that travels through HVAC systems unless properly filtered.
Understanding these pollutants helps you choose a purifier that targets both particles and smells, and confirms why a dual-filter setup (true HEPA plus activated carbon) is often the most effective approach after renovation.
Choosing the right purifier after renovation
Selecting the right air purifier after renovation means prioritizing filtration that handles both particles and gases. Look for:
- A true HEPA filter (HEPA H13 or better) to capture fine dust and microscopic particles.
- An activated carbon filter to adsorb VOCs, paints, solvents, and odors.
- A purifier with a visible CADR/room-coverage guideline that matches your space. Larger rooms require higher CADR values or multiple units.
- A model with auto mode, adequate noise levels, and energy efficiency so it can run continuously without becoming a nuisance.
- Replaceable filters and clear maintenance guidance from the manufacturer.
Air Purifier Info recommends pairing HEPA with carbon filtration for renovated spaces, especially in homes with children, pets, or allergy sufferers.
Placement and operation for rapid results
Effective air cleaning starts with proper placement. Position the purifier in a central location, off the floor, and away from walls or furniture that could block intake. Keep a clear path for air to circulate and avoid placing the unit behind doors or in corners where airflow is constricted. Run on Auto or a high-volume setting during heavy dust days, then adjust after the renovation peak. If possible, keep interior doors open to promote cross-ventilation when outdoor air quality is good; otherwise, close doors to concentrate cleaning in the most-used spaces. Consistent operation for the first 24–72 hours yields the fastest improvement in air quality.
Filtration and maintenance schedule
After renovation, filtration needs may be higher than usual. Keep spare HEPA and carbon filters on hand and replace them as recommended by the manufacturer based on usage. Pre-filters should be cleaned or washed regularly to extend the life of the main filters. If you notice a drop in performance or a persistent odor, inspect the unit and replace filters sooner. Clean the exterior and air intake grills periodically to prevent dust buildup, and never operate a purifier with a visibly damaged cord or enclosure.
How to pair with other cleaning steps
An air purifier works best when combined with targeted cleaning and ventilation. Use damp microfiber cloths to wipe surfaces, capture settled dust from floors and vents, and vacuum with a HEPA-filter-equipped vacuum to minimize re-entrainment. When outdoor air quality is good, briefly open windows to exchange stale air, but monitor for pollen, dust, or odors. Seal off dusty zones temporarily during intense sanding or spraying, and run the purifier in adjacent rooms to prevent cross-contamination. This multi-pronged approach accelerates the return to healthy air more than filtration alone.
Common mistakes to avoid
- Relying on a purifier alone without addressing dust sources or moisture control.
- Choosing a purifier without adequate CADR for your room size.
- Running a purifier too close to walls or behind furniture, which reduces airflow.
- Using ozone-generating devices or ozone-emitting purifiers, which can irritate lungs.
- Neglecting filter changes or pre-filter upkeep, leading to reduced effectiveness.
Real-world scenario: a small apartment after renovation
In a small apartment, a single compact purifier can dramatically improve air quality during and after renovation. Place it in the living area or near the main dust source, run it continuously, and monitor performance with the device’s indicator. In the evenings, move the purifier to bedrooms to ensure restful sleep without distraction from noise. This practical approach helps renters and homeowners restore comfort quickly, even with limited space.
Tools & Materials
- True-HEPA air purifier (H13 or better)(CADR should suit room size; aim for a unit rated for at least the room’s square footage with comfortable airflow.)
- Activated carbon filter or carbon cartridge(Needed for VOCs, odors, and chemical fumes; ensure compatibility with purifier model.)
- Replacement filters (HEPA & carbon)(Have on hand to maintain performance; check replacement schedule in manual.)
- Microfiber cleaning cloths(Dust-prone surfaces and grills; prevents re-entrainment.)
- Vacuum with HEPA filter(Use frequently during cleanup to reduce settled dust.)
Steps
Estimated time: 2-6 hours
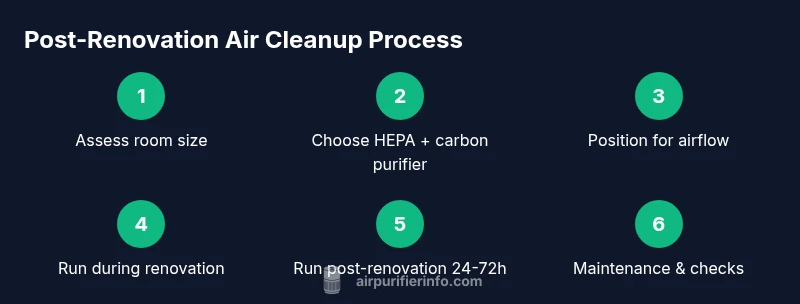
- 1
Measure room and select purifier
Measure length, width, and height to determine room volume. Choose a purifier whose CADR matches or exceeds the room size for effective air exchange. If you’re unsure, start with a unit rated for a slightly larger space and adjust later.
Tip: Use the manufacturer’s room size guidance and consider a backup purifier for larger open-concept areas. - 2
Unbox and prepare filters
Install the HEPA and carbon filters per the purifier’s manual. Ensure seals are tight and the unit is ready to operate on auto mode. Pre-clean or pre-filter any detachable components if recommended.
Tip: Handle filters carefully to avoid dislodging dust into the air. - 3
Position purifier for airflow
Place the purifier near the center of the main living area, elevated 1–2 feet off the floor, with at least 1–2 feet of clearance on all sides. Avoid corners and large obstructions that block intake or exhaust.
Tip: A central position maximizes air mixing and cleaner air distribution. - 4
Run during renovation activities
Keep the purifier running during active construction to reduce airborne dust and fumes at the source. If possible, run it on auto mode with the lowest quiet setting during quiet periods to minimize disruption.
Tip: Close interior doors to localize airflow around work zones if you have a larger home. - 5
Post-renovation run and assess
Continue running the purifier for 24–72 hours after the last major renovation activity. Use built-in indicators or a low-cost air quality monitor to confirm improvements before closing the space.
Tip: If odors persist, check filters and ventilation; consider additional units for larger spaces. - 6
Maintenance and filter changes
Follow the purifier’s maintenance schedule for HEPA and carbon filters. Clean the pre-filter monthly and replace main filters as recommended. Mark a reminder to replace filters when performance declines or odor returns.
Tip: Never skip filter changes; clogged filters reduce airflow and effectiveness. - 7
Integrate with ongoing cleaning
Combine filtration with regular damp cleaning, HEPA vacuuming, and moisture control to prevent mold growth. Maintain humidity around 40–50% to reduce dust stability and preserve filter life.
Tip: Pair purification with proper humidity control for best results.
Questions & Answers
What is the best air purifier after renovation?
There isn’t a single best model for every space. Look for a true HEPA filter (H13 or better) paired with an activated carbon filter, sufficient CADR for your room size, and a reputable maintenance schedule.
The best purifier depends on your room size and needs, but prioritize HEPA plus carbon filtration and easy maintenance.
Is carbon filtration necessary after renovation?
Yes. Activated carbon filters help remove VOCs, paints, solvents, and odors that often accompany renovations. Pairing carbon with HEPA improves overall air quality.
Carbon filtration targets smells and chemical fumes that HI-EPA alone can miss.
How long should I run the purifier after renovation?
Run the purifier continuously for at least 24–72 hours after the major renovation activities. If odors or dust persist, extend the run time and monitor air quality.
Keep it running for a couple of days to clear out lingering dust and fumes.
Can purifiers remove paint fumes effectively?
Purifiers with activated carbon filters can reduce paint fumes, especially when used in tandem with good ventilation. They don’t eliminate all fumes instantly but significantly lower exposure.
Carbon filters help reduce fumes when combined with ventilation.
Is it safe to run purifiers with windows open?
Opening windows briefly can help with ventilation if outdoor air is clean. Monitor for dust ingress and odors, and close windows during heavy work to maintain filter effectiveness.
If outdoor air is clean, a quick fresh-air exchange can help; otherwise, keep them closed during filtering.
Do air purifiers help with pets and allergies after renovation?
Yes. Purifiers with HEPA and carbon filtration help reduce dust, dander, and allergens, improving comfort for pets and allergy sufferers in the home.
Purifiers can lower dust and pet dander levels, aiding allergy management.
Watch Video
Main Points
- Run a true HEPA with carbon purifier after renovation.
- Position centrally for best airflow and cover.
- Maintain filters regularly for ongoing cleanliness.
- Pair purification with damp cleaning and humidity control.
- Plan for 24–72 hours of post-renovation purification activity.